You’re trying to demonstrate someone how to use their computer, but you’re having trouble putting it into words.
Screen recording can be a useful tool for showing someone how to do something on their computer, but getting started isn’t always simple.
It’s simple to record screen in win 10 so that you may capture everything that happens. Additionally, Edon Lazaj‘s article make trimming and sharing your recordings with others a breeze.

How to record screen in win 10 Windows 10?
Activate Game Mode on your computer
Step 1: Go to the Start menu and choose Settings.

Step 2: Select Gaming from the Settings menu.

Step 3: Select Game Mode and turn it on in oder to record screen in win 10.

Note: Go to Game Bar’s settings to see what the maximum time of a screen recording can be. Select Settings from the Start menu. Go to the Gaming tab. Background recording will be available under Captures. Select the maximum recording time from the drop-down menu, which ranges from 30 minutes to 4 hours.

You’re ready to record your screen now. Only one application can be recorded at a time in the Windows 10 Game Bar. This implies that after you’ve begun recording, you won’t be able to navigate to another window or ALT + TAB your way out. You also won’t be able to record your Desktop, File Explorer, or Maps.
How to record screen in win 10: Using Game Bar
Here’s how to use the Game bar in Windows 10 to record. If you haven’t done so already, you’ll need to set up the Windows Game Bar. Follow the steps below after you’ve set it up.
Press Windows + G on your keyboard after opening the app or application you wish to record. This brings up the overlay for the Game bar.

You’ll see many widgets on the Gamebar overlay, including Capture, Audio, Performance, and even Xbox Social. These widgets are also linked to a primary toolbar at the top of the screen, which you can add or delete at any moment and record screen in win 10.

Click the Record button in the Capture widget to record your screen.
A recorder appears in the upper right corner of the page as the recording begins. You can use this screen to check the recording time, press the Stop button (blue circle with a white square in the center), or adjust your microphone.

When you’re done, press the Stop button, and a message flyout displays on the right side of the screen, indicating that you’ve made a recording. You can access the recording by clicking this message or by navigating to the recording in your Videos file.

Windows 10 Game Bar Limitations
The Game bar in Windows 10 makes it simple to record your screen, but there are a few restrictions.
- The Game bar cannot catch some applications, such as File Manager.
- You can’t take a screenshot of your desktop; you have to take a screenshot of a program.
- If another window emerges over the one you’re recording while you’re capturing, it won’t appear in your recording (but the movement of your cursor will).
- You can utilize apps from the Windows Store as well as those you already have on your PC.
Screenrec
- ScreenRec can be downloaded and installed.
- Select your capture location by pressing Alt + S.
- To begin recording your screen, press the Video Camera button.
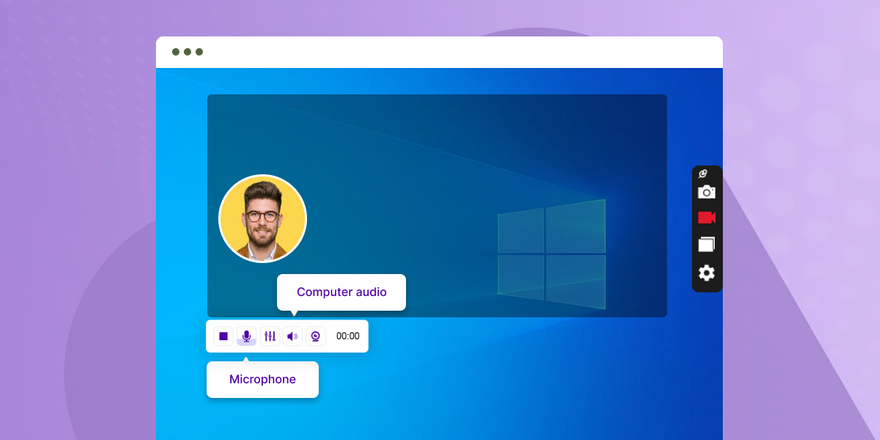
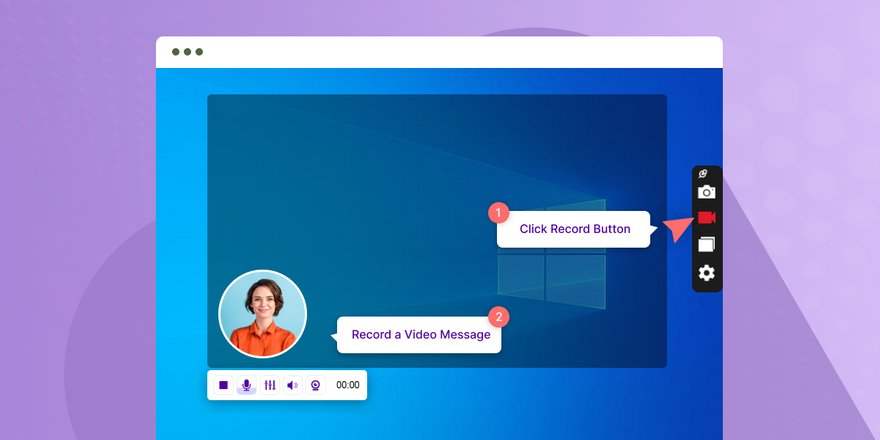 Audio from the screen should be recorded:
Audio from a computer. Screenrec has the ability to record the audio that is being played through your computer speakers. Toggle PC audio recording on or off by clicking the speaker icon.- Microphone. You have the option of recording both your microphone (voice) and your screen video. Simply click the toggle next to the microphone icon to turn off your microphone.
Copy the private sharing link and paste it here.
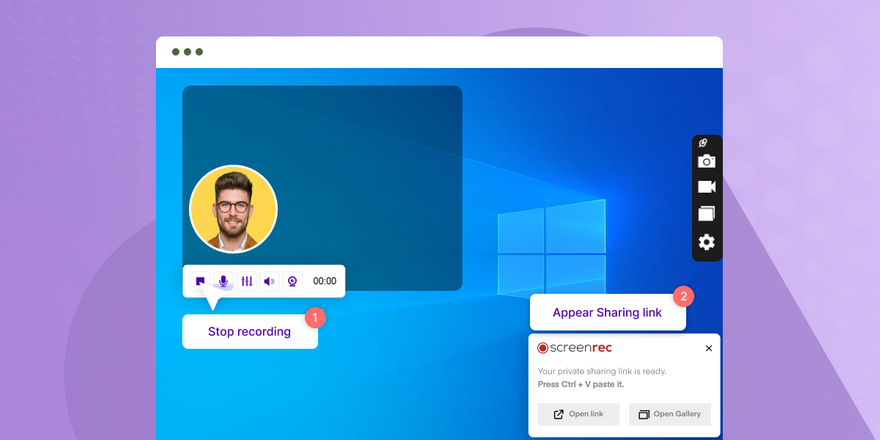
Following each recording, you’ll be given a unique URL that you can share with whomever you choose. You can send the screen recording to a friend or post it on your website. Simply copy and paste the link into your browser.
How to record screen in win 10 by OBS (Open Broadcaster Software)
- Download and install OBS
- Go to Settings
- Adjust the video and audio bitrate if necessary:
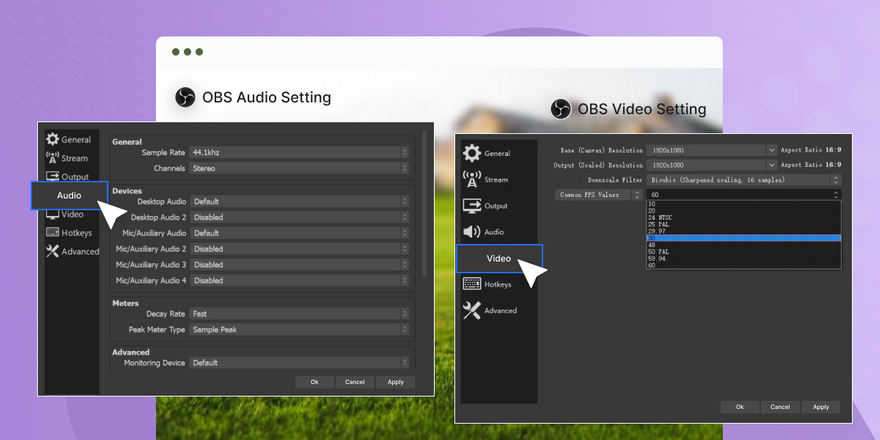
- Your computer’s processing power determines the bitrate. Choose a lesser bitrate if your machine isn’t up to par. For a more powerful machine, increase the bitrate.
- After making a modification to a setting, remember to click Apply. When you click OK, the modifications will not be automatically applied.
- To ensure that your movie can be seen on any device, we recommend changing the format to.mp4. *PLEASE NOTE: APPLY IS REQUIRED*
- Audio is automatically recorded, both from the system and from the microphone.
- To turn off the audio recording, go to the settings menu. Here’s how to do it.
- To begin screencasting, click the + sign next to Sources and choose Display Capture.
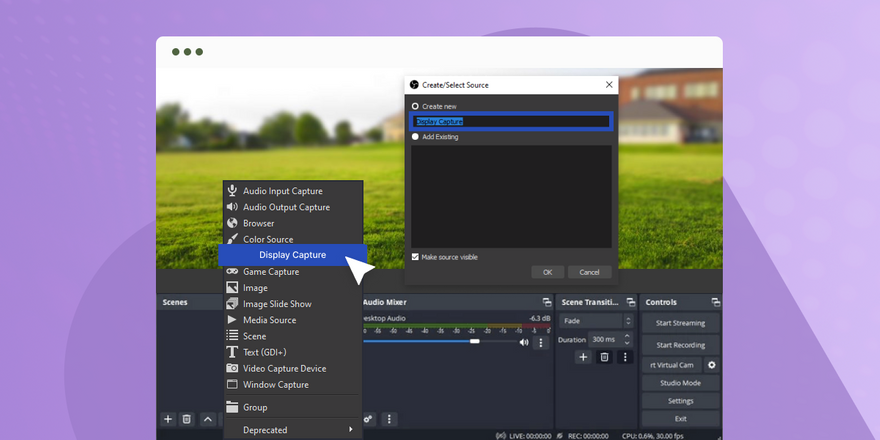
- Click Begin to tape. Your recording should be shared with others. Your recordings are kept on your computer’s hard drive. You can post them to YouTube or another video storage site to share them with others.
How to record screen in win 10 by Powerpoint
Open a new presentation in Powerpoint and go to Insert > Screen Recording.
:max_bytes(150000):strip_icc():format(webp)/Record_Win10_08-6e9fa2f948b8440bbd452d38fcb19179.jpg)
The PowerPoint presentation will minimize, and your desktop will appear. If you don’t get a prompt to select the area you want to record, click Select Area and drag your cursor around the area you want to record. A red, dashed bounding box appears around the area you want to record.
:max_bytes(150000):strip_icc():format(webp)/010_Record_Win10-263460e09c8140c7a17e819590a4181b.jpg)
Once you’ve set the area, you can click Audio to turn the audio on or off and Record Pointer to capture (or not) the pointer as you move around the screen. When you’re satisfied with your setting, click Record.
:max_bytes(150000):strip_icc():format(webp)/Record_Win10_11-7a7585fb8c3146e49da419c29cec5d79.jpg)
A short countdown will appear, and then your recording will be live. The control panel for your recording may also disappear. If you push your cursor into the top, middle of the screen, the control box will appear again.
When you need to pause or stop your recording, you can choose Pause or Stop from the Recording menu.
:max_bytes(150000):strip_icc():format(webp)/Record_Win10_12-e142f6ebaa354f59afbd65cadfa70f5b.jpg)
Once you stop the recording, you’ll be taken back to PowerPoint, and the recording will insert into the slide you selected. To save it to your computer, right-click the recording and select Save Media as from the menu.
:max_bytes(150000):strip_icc():format(webp)/Record_Win10_13-3cb4907a16cf46b58577c2afbc66901d.jpg)
Navigate to where you want to save the file and then click Save.
Using Microsoft Stream,
You can create short screen recordings of up to 15 minutes, including your camera and microphone, without any additional software.
1. In Microsoft Stream, go to Create > Record screen.
2. Allow Microsoft Stream to utilize your camera and microphone when requested by your browser.
3. Your camera and microphone will be deactivated if you choose Block. To enable them, go to your browser’s address bar and click the lock icon, then select Allow next to the appropriate device to record screen in win 10.
4. Choose either the Webcam or the Microphone icon. To set up your camera and microphone, click the microphone icon. Make sure your USB camera or microphone is plugged in before selecting it from the menu. If you don’t want your camera or microphone to be included in your recording, you can turn them off.
5. You’re all set to begin recording!
Choose the camera and microphone you’d want to use. When you select your desired camera and microphone, the illustrations in each selection choice will refresh.
Record the screen by Record button
1. To begin recording, press the Record button.
2. Choose the part of your screen you want to share—the entire screen, an application window, or a browser tab—and then click Share. Select the Share audio checkbox to include sounds from your PC in the recording.
3. You may need to set up screen recording permissions in System Preferences if you’re using macOS Catalina. Learn more about the permissions in macOS Catalina.
4. Wait for the recording to begin after the countdown has finished.
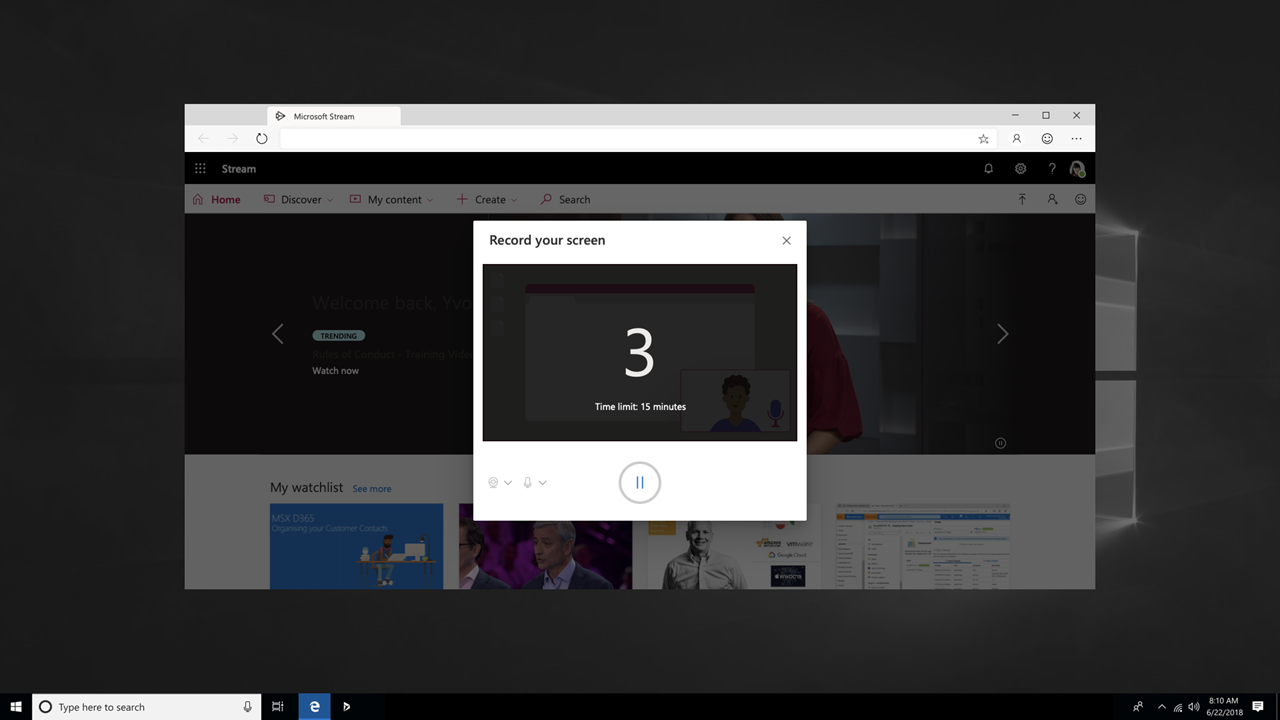
5. Now you can select the application or window that you want to record screen in win 10.
6. Switch back to the Microsoft Stream screen recorder tab in your browser when you’re done recording or if you want to take a break. Switch to another window if you need to do something else while recording. You must return to the screen you’re recording if you need to take any action during the recording.
7. At any point, use the Pause symbol to stop recording the screen, audio, or camera. To resume, select the Play icon.
8. Select Next to review your recording once you’ve completed.
How to record screen in win 10 or any PC?
Let’s look at how to record movies on Windows 10 or any other PC now that we’ve covered screen recording on Windows 10.
Simply follow these easy steps:
Step 1: Go to the start menu and open the ‘Camera’ app, which can also be found in the All Apps list.

Step 2: When the camera is opened, there are photo and video modes to pick from on the right. You will be able to record for a maximum of three hours with this app.

Step 3: After you’ve finished record screen in win 10, it’ll be saved to the Camera Roll folder by default.

You’ll need to connect a webcam to your PC if you’re recording videos with a PC that doesn’t have an in-built camera. Here’s a little lesson that will show you how to screen record and record a video at the same time.
A third-party app will be necessary for better quality and more flexibility in terms of video recording duration.
Upload screen recording
You’ll have a file to do whatever you want with after you’ve record screen in win 10. Email it to a coworker or upload it to a favorite Stream channel.
1. Your video will begin uploading to Stream on the Upload to Stream page. While you wait, you can do the following:
- Keep an eye on the uploading process.
- In the details field, enter the video’s title, description, and language.
- Everyone in your company will be able to see your video after it’s been released. Deselect this checkbox to make the video only accessible to you: Allow this video to be viewed by everyone in your company.
- Click Update video information to set custom permissions, groups, channels, and other parameters.
2. After the upload is complete, you have the option to publish or save:
- Press the Publish button. Your video is now complete. To get to the video page on Stream and watch or share your video, select Go to Video. After the processing is finished, you may trim your movie by going to the More actions menu and clicking Trim video.
- If you’re not ready to post your video yet, choose Save as draft. Your video will be kept to My Content > Videos in Stream, where you can share it whenever you want.
F.A.Q Record screen in win 10
How to record your computer screen in Windows 10?
To get started, download and install the application on your computer.
You’ll notice four tabs in the next window that you may utilize to adjust the recording process and settings.
When all of the settings are perfect, click “Start Capturing” or press “F10” on your keyboard to start recording.
How do I record my screen in Windows 10?
On Windows 10, you can use the PrtScn key on your keyboard or software like Snip&Sketch to snap a screenshot.
If you wish to record a screen, press Windows Key+G to bring up the Game Bar.
Third-party apps have even more features, such as sending screenshots to the internet automatically.
How to stop screen recording Windows 10?
– Part 1: How to Stop PowerPoint Screen Recording
– Part 2: An Easier Tool – Record and Exit Quickly and Easily
– Part 3: When it comes to PowerPoint, here are some helpful hints.
How do screen recording Windows 10?
Go to Start > Settings > Gaming to enable Game Bar. Then turn on Game Bar recording, snapshots, and broadcasting.
Then, under the Capture widget, press Windows+G and click the Record button.
Another option: Go to Insert > Screen Recording in a PowerPoint presentation. Select Record and then select a location on the Windows desktop.
We’ve got the solution for you if you’re seeking for a simple way to record screen in win 10. In this post, we’ll show you how to record your screen with just a few clicks using the new Game Bar. This method is simple and quick, whether you want to capture a gaming session or make an instructional. So don’t put it off any longer; begin capturing your screen right now!
